Why Swym Wishlist?
It takes most customers more than one visit to your website to decide whether they are going to buy your product. They take time to browse through your products and sometimes even compare them with what other retailers have to offer before finally making a purchase. It is understandably hard for your customers to keep track of everything they’ve looked at when your store has hundreds of products, especially when they come back a second time to find what they liked on their previous visit.
With the Swym Wishlist Plus, your customers can save their favorites and create their own wishlist that can be accessed anywhere, at any time! Their shopping activity can be connected to all their devices, and only requires them to be logged in.
We have a simple, code-free way to set up the Wishlist Plus app on your Shopify or BigCommerce store and here is a quick guide to walk you through the process. If you’re on a different platform you’ll need a little help from our support team.
How to install
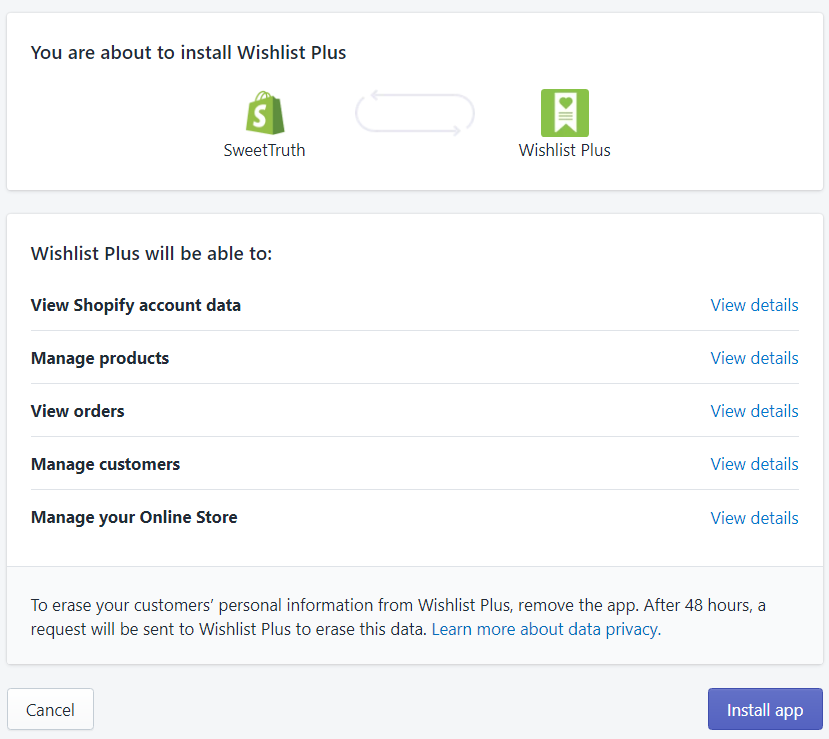
On the Shopify Platform – Install the Wishlist Plus app by Swym Corporation from the Shopify App store. Click on ‘Install app’ and you will be taken to the Swym Admin.
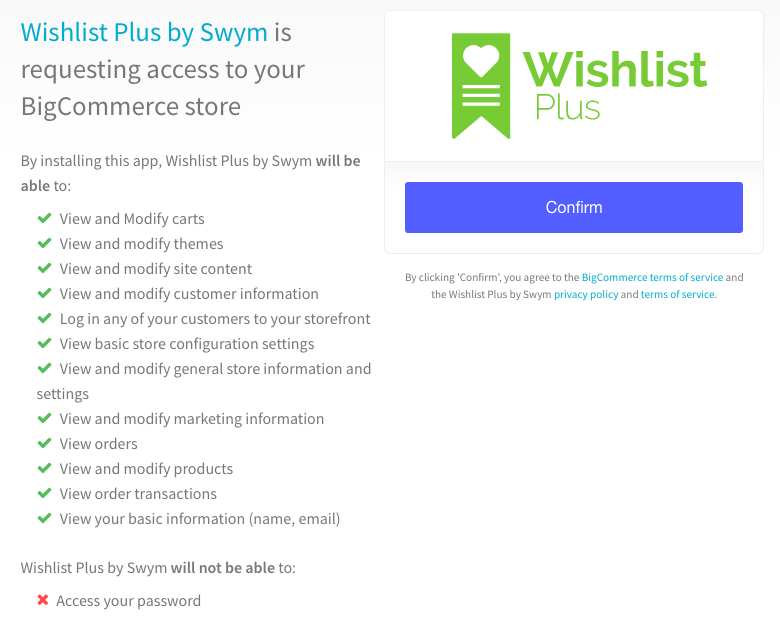
On the BigCommerce Platform – Install the Wishlist Plus app by Swym Corporation from the BigCommerce Marketplace. Click on ‘Get this App’ and you will be directed to your Store. After you click on ‘Install’, allow Swym access to your store by clicking on ‘Confirm’.
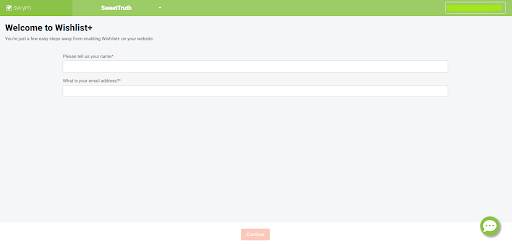
Before we begin with the setup process, you will need to enter your name and email address. Swym uses this contact information to communicate with you or your store. Click on ‘Continue’ and you will follow these 4 steps to make the Wishlist Plus app live on your store.
- Plan Selection
- Launch Button Setup
- Button Details
- Email Setup
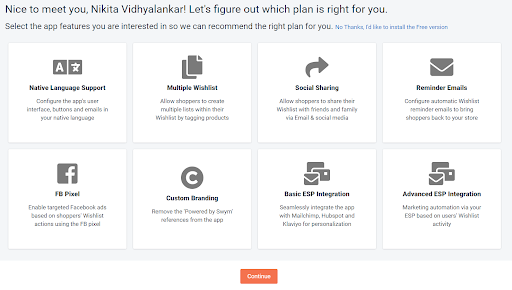
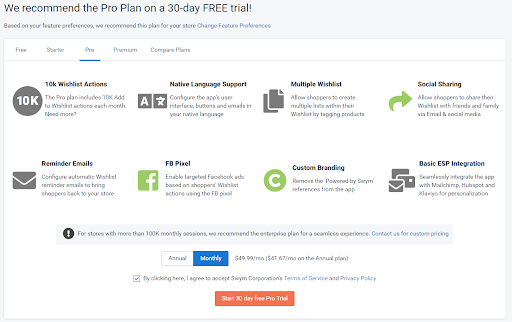
Step 1: Plan Selection
This step will guide you in choosing the right plan for your store based on your requirements. You will notice 8 different app features listed. Select the features that interest you, and you will be recommended a plan best suited for your needs. While these features come under the paid plans, we also have a free plan that includes a limited set of features and will enable you to get started with the app. These are the plans we have available:
- Free Plan with 2,500 monthly site sessions
- Starter Plan with with 10,000 monthly site sessions
- Pro Plan with 50,000 monthly site sessions
- Premium Plan with 100,000 monthly site sessions
- Sites with over 100,000 monthly sessions require an Enterprise Plan
Note: The Free Plan is only available on Shopify. However, our Starter, Pro and Premium plans include a 30 day free trial. You will have the option to cancel your subscription at any time during this period and will only be charged at the end of the trial period.
If you wish to opt for the Free Plan, you will notice a separate link above the features – ‘No thanks, I’d like to install the Free version’. On the other hand, if you want the option to change the paid plan recommendation, you will find the option to either ‘Change Feature Preferences’ or navigate the tabs on top which will give you a quick overview of the different plans we have available. By clicking on the ‘Start Trial’ button, you will be redirected to the payment confirmation page hosted by the e-commerce platform you are using. Once the payment is approved, you can continue with the configuration.
Step 2: Launch Button Placement
In this step, you will configure the placement of the launch button. You have three options, and your setup process will slightly differ based on what you choose.
- As a floating Button
This is a default option and does not require any additional code for setup. This is positioned in fixed places on desktop, tablet and mobile screens. We have made sure the design is adaptable on any device. You will also be able to decide on the following components:
– Placement: You can choose where you wish to place the launch button, from four options available.
– Name: This is what your Wishlist Plus app will be called in your store. You will want to brand this in such a way that it appeals to your customer base.
– Color: This is the default color that will be used on your store across all Wishlist Plus components. You have two options to pick a color – you can either use the Color Picker or enter the Hex Code that matches the color scheme of your store.

- As a menu item
This allows you to configure the entry point to the wishlist page as a menu option on the navigation bar. You will find instructions to enable this from your Shopify admin page in the Swym dashboard while setting this up.
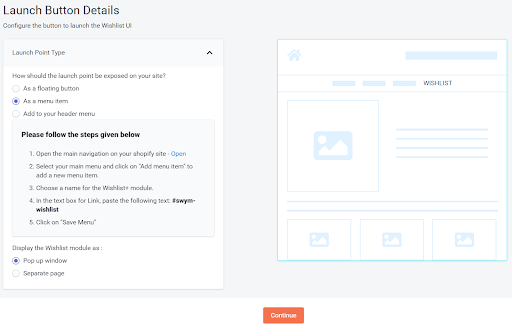
To know more about how to add WL+ Launch Point as a Menu Item, click here.
- Add to your header menu
If you are looking to add the wishlist launch point in your header menu, please go through this article on ‘Adding the Wishlist Launch point to your Shopify site’s header menu’. This requires changing code manually in your theme to enable the launch point.
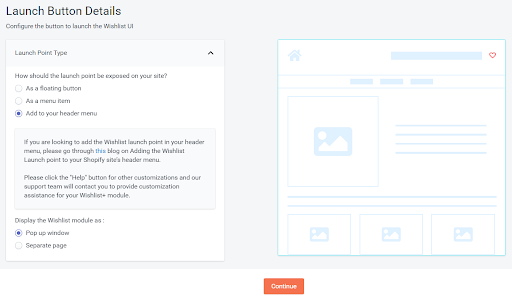
You will be able to see a preview of what you choose on the right. Since the setup process for each option is different, please reach out to us if you need any help. You can either check out our Help page or reach out to our support team for any assistance.
Disclaimer: Based on the plan you choose and the customization/support request you have, the response time may vary, generally within 24 hours.
Click Continue to move to the next step.
Step 3: Button Details
This step helps you decide how you want the ‘Add to Wishlist’ button to look on all your product pages. By default, this button will appear beside the ‘Add to Cart’ button on the product page.
- Appearance
We give you the following options to choose from:
– Icon + label as a button
– Label as a button
– Icon + label as text
– Label as text
– Icon only

You can also customize the color of the wishlist icon and have the option to change the color once a customer has added a product to their wishlist.
- Labels
This is the text on the label of your wishlist. The text can be changed after a customer has added a product to their wishlist and this can be set up here.
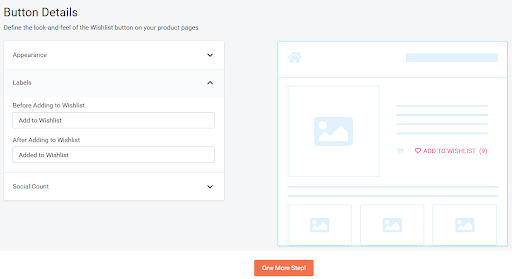
- Social Count
It displays the number of customers who have added that particular product to their wishlist and helps show it’s popularity. You have the option to either enable or disable it.
We’re almost done! Click on One More Step.
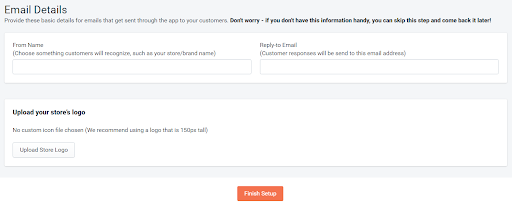
Step 4: Email Details
This is just an optional step and you can come back to it if you haven’t set this up yet. Here, you can decide the name and the email address you wish to use to send email alerts to your customer. Please ensure that the email ID you enter here is active as the ‘Reply to’ email will be verified before completing this step. You can also upload your logo here. The logo file size should be less than 150 KB and the dimensions should not be more than 150×150 px (length/height).
Click on Finish Setup and you will be redirected to the Swym dashboard. This also includes the settings page if you’d like to make any more changes.
You will notice an option to see the wishlist app on your store from your Shopify Admin. This will launch a browser session to your store where you can check the Wishlist Plus settings and make sure it is configured just the way you wanted it.
We strive to provide a seamless experience across as many front-end themes as possible. However there are some themes that are more customized and requires a little bit of work for the Wishlist button to appear correctly. Please reach out to us via email (support@swymcorp.com) if this is the case and we will help you fix it. Based on the plan you have chosen and the customization request, the response time may vary. However, you will receive an estimate as to when you can expect a fix within 24 hours.
Was this article helpful?
That’s Great!
Thank you for your feedback
Sorry! We couldn't be helpful
Thank you for your feedback
Feedback sent
We appreciate your effort and will try to fix the article